Adventures in Book Nook Recovery
As an Amazon associate, I may earn a small commission if you navigate to Amazon from my site and buy something. This will not result in an extra cost to you.
It’s said that the first step to recovering from addiction is admitting that you have a problem. So, this is me admitting that I have a problem. I’m addicted to book nooks. There. I said it. Huh. I thought I’d immediately feel better after completing step one, but I don’t.
On to step two…and this is where I admit I’m stepping off the well known path to recovery to go my own way. My remedy for my addiction is to put myself on a book nook budget. Specifically, I will allow myself no more than one book nook per quarter. As we are now in the second quarter of the year, I’ve gotten another book nook.
I bought this one from Amazon, called the MagicSpell Library from a maker called Dolphin Island. And this is the very best kit I’ve ever worked with. I mean, it’s perfect. It has all the pieces I could possibly need, plus a bunch of extras, in case I mess up. It has everything I’d need to use (except for a couple hand tools that can be found in any household toolbox), including some perfect precision tweezers and a little applicator tube of glue.

One small aside about the glue…there wasn’t enough of it, and the applicator tip dispensed a thick line of it all at once. It was nowhere near as precise as my little applicator bottle, which I keep filled with my bookmaker’s glue. And the kit’s glue did not hold as well as my own glue. A couple times, after I jolted the mostly-assembled book nook, things that had been glued to the walls and shelves a day earlier popped right off and had to be glued back in place. Okay, so the kit wasn’t perfect. But it was nearly perfect.
Another thing that I was extremely enthusiastic about was that all the paper bits of the kit were in sticker form. When one has many fake little books to make, that process goes much faster when the paper bits can just be stuck onto the wooden bits, instead of being glued into place.

A unique (as far as I know) feature of this kit was that it would respond to certain voice commands under some circumstances, which I will describe more fully later.
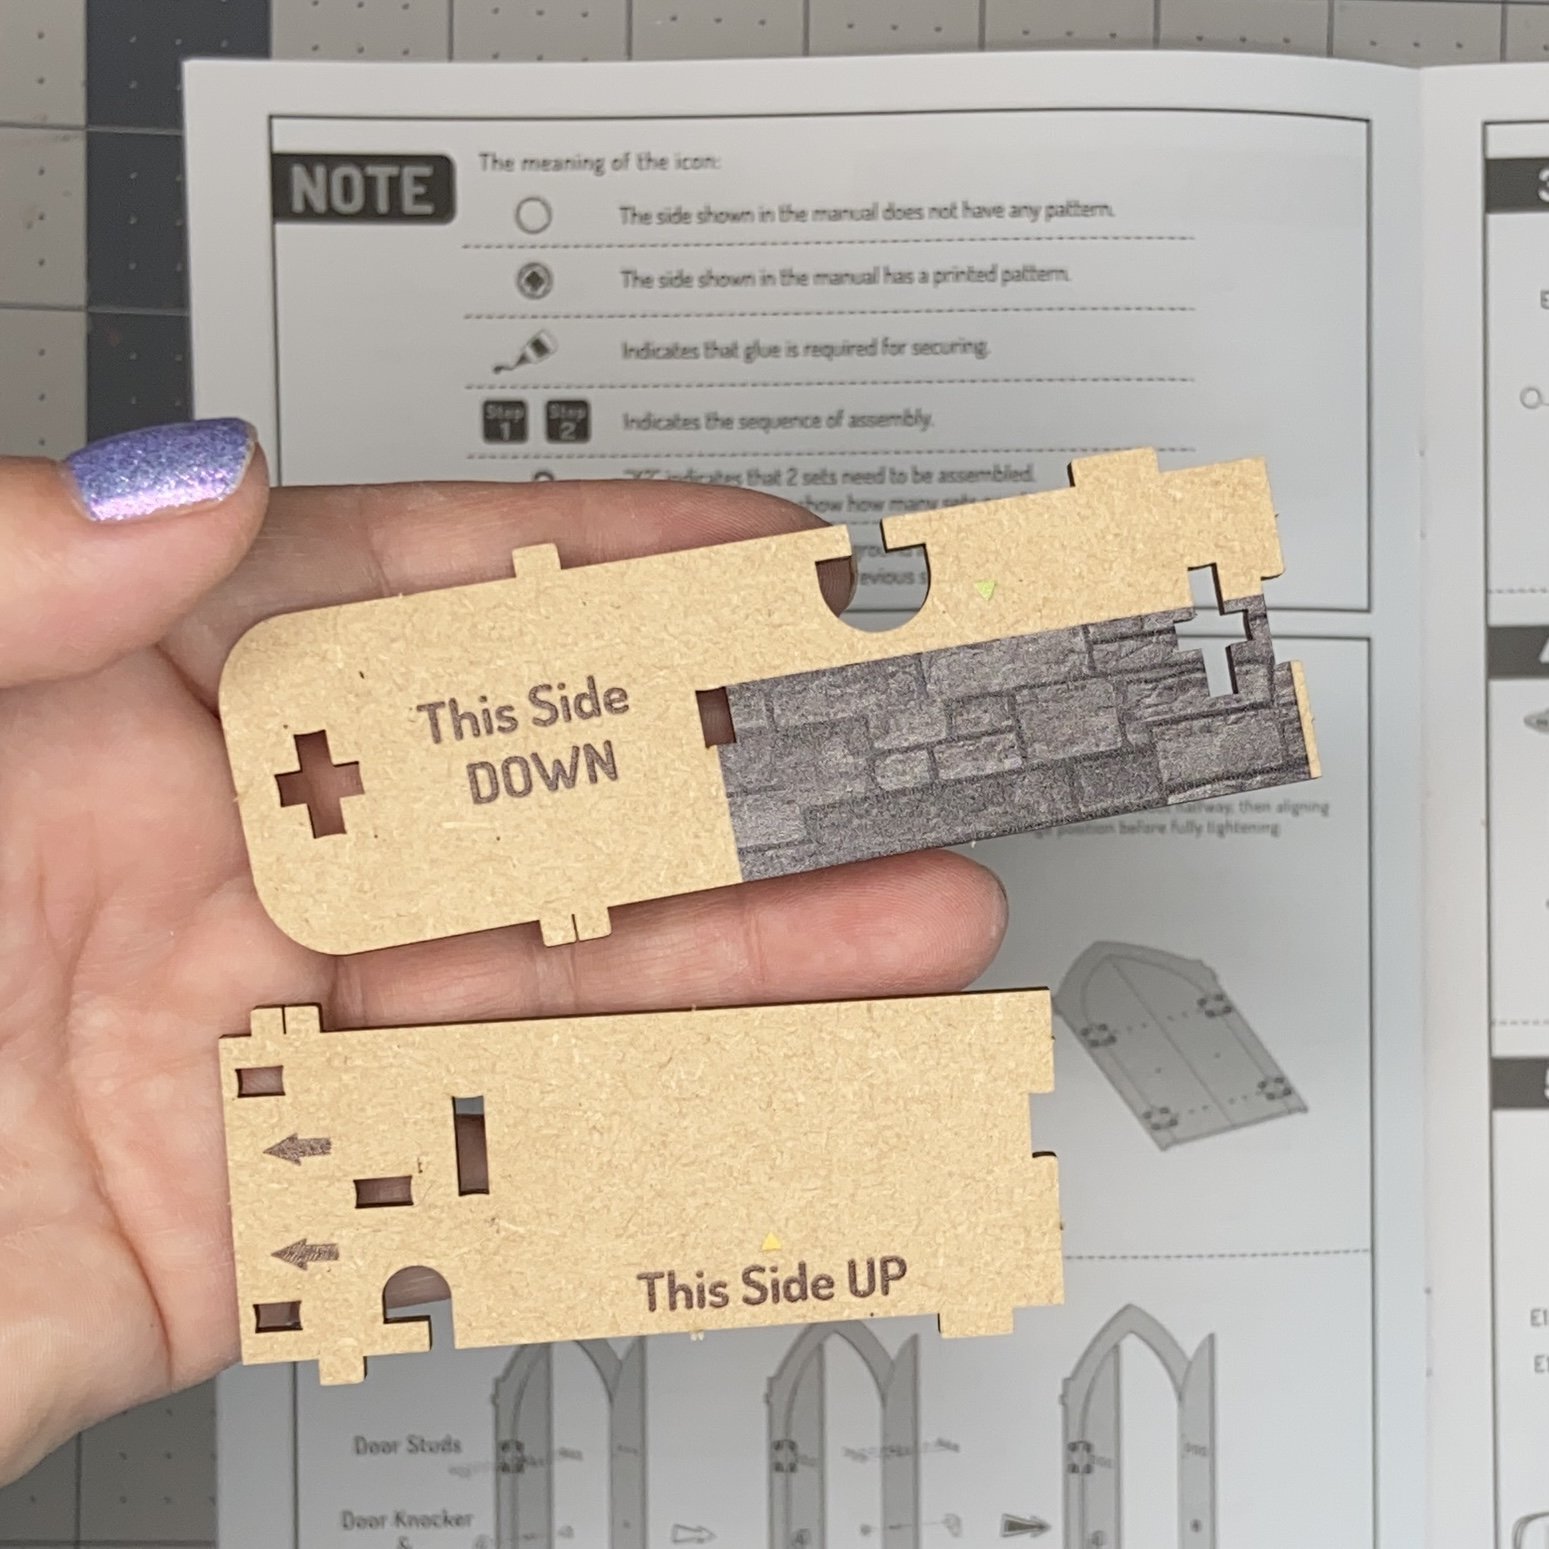
And the final really fantastic thing about this kit was that everything was beautifully described and marked. The directions started out with an extremely clear key for understanding the illustrations that would follow. And even some of the wooden pieces were marked to show things like placement, orientation, and where the lighting and the wires were supposed to go. It was honestly a fantastic experience working on this nook.

Okay enough waxing rhapsodic…let’s get to the actual assembly. The first step was to assemble the gates/doors that would open and close at the front of the nook. These pieces were assembled with actual hinges! And…there was an extra hinge set in the kit. Then the knobs were attached and some metal bits that I think were supposed supposed to look like medieval bosses but were the size of small rivets. I had a handful of the rivets leftover.
Next, the directions had me working on the book-like sidewall of the nook, which is where the main board for the electronics was installed as well as a screen that would show flames but not be visible. I’ll explain later about the flames, I promise. It’s really clever. Again, I was quite taken with the clarity of the printed directions as well as the hints on the wooden pieces themselves.


Next, I poked out a bunch of wooden forms that had book shapes printed onto them and glued them into a shelving system, which was then glued to a wall. In a couple instances, as the pieces came free of their backing board, a tiny bit of the painted design peeled off. In that case, I just used some of my liquid acrylic paint and a tiny brush to touch up the color.


After that, it was making books and scrolls. There were three sizes of books: large, small, and thick, the latter being made with two of the large book pieces glued together. I lost count but I think I must have made up over 150 books. And I think about 25 scrolls. That did take awhile.


I did take a moment to enjoy my usual layout of miniatures waiting to be placed. Then I brought the bookcases and the books and scrolls over to my work surface and prepared to make a beautiful library.


The directions for this part did show an illustration of how it might look but also said to express my creativity and do it any way I liked. (I’m paraphrasing, of course.) I just glued books and scrolls in until it looked mostly full and kinda cool. I’m pleased with how it turned out.
When the pair of bookshelves were finished, I had quite a lot of books and scrolls left over. I’ll hang onto those. I’m sure I can think of something to do with them…

At about this point, I rather came to grief. The bookshelves were to be attached in a sort of two-story arrangement, and I think I must have done something slightly wrong when attaching both bookshelves. Somehow, the lower one was just slightly out of alignment, so that when it came time to start attaching the sides, one of the pegs from the lower shelf just would not go in. The instructions warned that every time the outer casing of the nook was being assembled, the fittings were tighter, so as to make the structure stronger, and advised that the maker go slowly and patiently. But no matter how slow and patient I was, this one set of pegs just would not go in and I could clearly see that it was slightly misaligned. Once I got everything else attached and slotted in, it was clear to me that that particular obstreperous peg wasn’t actually critical. There were enough other support points that the nook could do without that one. So I cut it off. However, I was certain that I hadn’t seen the end of that particular problem because the other side of that bookcase was now slightly out of alignment with its fellow bookcase, and would therefore not attach properly on the other side either. And sure enough, when I was trying to attach the other side, I had to cut that peg off as well. But the assembly was still tight and solid, so I’m good with it.


Onward to the braziers, which would appear to be on fire, thanks to the screen I installed earlier. This assembly involved cutting a piece of chain into multiple pieces, and then attaching the chain pieces to the brazier pieces with jump rings. I still had my special pliers from my long-ago attempt at making chain mail jewelry (using the instructions in this book, which I still have; it’s a beautiful book), and I still remembered how to attach jump rings. In case the reader does not possess this knowledge, this extremely short YouTube video will show you what to do and what not to do. I attached the chains to the braziers as directed, and then glued in the translucent yellow “stones” (polished chunks of glass, I think). For some reason, I didn’t get any good pictures of this part of the process. As often happens, I got caught up in “doing” and forgot about documenting.
At this point, I was mostly done. I hung the braziers as directed, and installed the two sets of mirrors which would provide an infinity effect, and the piece of shiny clear plastic which was set in at an angle and which would reflect the flame effect to show in front of the braziers. Then I closed up the top and I was done.

Because the book nook had a receiver for hearing spoken commands ("Incendio” to turn the flame and sound on, “Extinguish” to shut them off), it uses quite a lot more battery power than most book nooks. So it came with a larger battery box that was connected to the book nook with a USB cord. This gives one the option of connecting a power bank to the nook instead of the battery box, or even of just plugging the thing into a wall outlet. With this in mind, I wanted to have quick access to the battery box (and the power bank I planned to use later), so instead of storing it in the book shape on the side of the nook, I cut a little notch for the cord to come out of the book shape. This way, the battery box is on the outside and can easily be turned on and off to conserve power. The notch is at the back, and is not visible from the front.
On the back of the book nook is a switch that lets the user either set the nook to receive voice commands, or else to use a touch button on the top to switch the inner lights on, add the flame and sound effects, and turn off. I mostly use the button, as that uses less battery power. In the finished views below, you can see the nook closed, open with the lights on, and finally with the flame effect added. I just love the way the infinity effect mirror arrangement makes the bookshelves reflect on back as if the library goes on forever.


And finally, a short video to show the voice commands in action. There is no sound on these videos, so you’ll have to use your imagination. I’m waving around the little wand that came with the kit for just this purpose. As I speak the command, the flame comes on, accompanied by a “roaring fire” sound effect, and then when I speak the other command, the flames are extinguished. So cool!